Difference between revisions of "Maps"
(→Instantiation order) |
|||
| Line 1: | Line 1: | ||
== Map pool == | == Map pool == | ||
| − | The map pool differs for each league and for unranked games in career as well as for | + | The map pool differs for each league and for unranked games in career as well as for sandbox mode: |
{|class="wikitable sortable" | {|class="wikitable sortable" | ||
| − | !Map!!data-sort-type="number"|Bots!!data-sort-type="number"|Resources!!class="unsortable"|Bronze!!class="unsortable"|Silver!!class="unsortable"|Gold!!class="unsortable"|Platinum!!class="unsortable"|Diamond!!class="unsortable"|Master!!class="unsortable"|Grandmaster!!class="unsortable"|Unranked | + | !Map!!data-sort-type="number"|Bots!!data-sort-type="number"|Resources!!class="unsortable"|Bronze!!class="unsortable"|Silver!!class="unsortable"|Gold!!class="unsortable"|Platinum!!class="unsortable"|Diamond!!class="unsortable"|Master!!class="unsortable"|Grandmaster!!class="unsortable"|Unranked!!Test |
|- | |- | ||
| − | |The seven wonders ||data-sort-value="8" {{C}}|4 vs 4||{{R}}|7 | + | |The seven wonders ||data-sort-value="8" {{C}}|4 vs 4||{{R}}|7 ||{{X}}||{{X}}||{{X}}||{{X}}||{{X}}||{{X}}||{{X}}||{{X}}||data-sort-value="1" {{X}} |
|- | |- | ||
| − | |Set your priorities ||data-sort-value="10" {{C}}|5 vs 5||{{R}}|5 ||{{O | + | |Set your priorities ||data-sort-value="10" {{C}}|5 vs 5||{{R}}|5 ||{{O}}||{{X}}||{{X}}||{{X}}||{{X}}||{{X}}||{{X}}||{{X}}||data-sort-value="2" {{X}} |
|- | |- | ||
| − | |Meeting point ||data-sort-value="12" {{C}}|6 vs 6||{{R}}|5 ||{{O}}||{{O | + | |Meeting point ||data-sort-value="12" {{C}}|6 vs 6||{{R}}|5 ||{{O}}||{{O}}||{{X}}||{{X}}||{{X}}||{{X}}||{{X}}||{{X}}||data-sort-value="3" {{X}} |
|- | |- | ||
| − | |Circle of Death ||data-sort-value="18" {{C}}|9 vs 9||{{R}}|0 ||{{O}}||{{O}}||{{O | + | |Circle of Death ||data-sort-value="18" {{C}}|9 vs 9||{{R}}|0 ||{{O}}||{{O}}||{{O}}||{{X}}||{{X}}||{{X}}||{{X}}||{{X}}||data-sort-value="4" {{X}} |
|- | |- | ||
| − | |Split team ||data-sort-value="10" {{C}}|5 vs 5||{{R}}|0 ||{{O}}||{{O}}||{{O}}||{{O | + | |Split team ||data-sort-value="10" {{C}}|5 vs 5||{{R}}|0 ||{{O}}||{{O}}||{{O}}||{{O}}||{{X}}||{{X}}||{{X}}||{{X}}||data-sort-value="5" {{X}} |
|- | |- | ||
| − | |Lake Rushtown (Mcompany)||data-sort-value="10" {{C}}|5 vs 5||{{R}}|11||{{O}}||{{O}}||{{O}}||{{O}}||{{O | + | |Lake Rushtown (Mcompany)||data-sort-value="10" {{C}}|5 vs 5||{{R}}|11||{{O}}||{{O}}||{{O}}||{{O}}||{{O}}||{{X}}||{{X}}||{{X}}||data-sort-value="6" {{X}} |
|- | |- | ||
| − | |Kingmaker (Erik) ||data-sort-value="6" {{C}}|3 vs 3||{{R}}|7 ||{{O}}||{{O}}||{{O}}||{{O}}||{{O}}||{{O | + | |Kingmaker (Erik) ||data-sort-value="6" {{C}}|3 vs 3||{{R}}|7 ||{{O}}||{{O}}||{{O}}||{{O}}||{{O}}||{{O}}||{{X}}||{{X}}||data-sort-value="7" {{X}} |
|- | |- | ||
| − | |Barred Spiral (radyjko8)||data-sort-value="12" {{C}}|6 vs 6||{{R}}|0 ||{{O}}||{{O}}||{{O}}||{{O}}||{{O}}||{{O | + | |Barred Spiral (radyjko8)||data-sort-value="12" {{C}}|6 vs 6||{{R}}|0 ||{{O}}||{{O}}||{{O}}||{{O}}||{{O}}||{{O}}||{{X}}||{{X}}||data-sort-value="7" {{X}} |
|- | |- | ||
| − | |Dominance (Revenge) ||data-sort-value="6" {{C}}|3 vs 3||{{R}}|3 ||{{O}}||{{O}}||{{O}}||{{O}}||{{O}}||{{O}}||{{O | + | |Dominance (Revenge) ||data-sort-value="6" {{C}}|3 vs 3||{{R}}|3 ||{{O}}||{{O}}||{{O}}||{{O}}||{{O}}||{{O}}||{{O}}||{{X}}||data-sort-value="8" {{X}} |
|- | |- | ||
| − | |Flanking (LuBeNo) ||data-sort-value="8" {{C}}|4 vs 4||{{R}}|0 ||{{O}}||{{O}}||{{O}}||{{O}}||{{O}}||{{O}}||{{O | + | |Flanking (LuBeNo) ||data-sort-value="8" {{C}}|4 vs 4||{{R}}|0 ||{{O}}||{{O}}||{{O}}||{{O}}||{{O}}||{{O}}||{{O}}||{{X}}||data-sort-value="8" {{X}} |
|- | |- | ||
| − | |Mind Game (Sneaky/RC) ||data-sort-value="4" {{C}}|2 vs 2||{{R}}|3 ||{{O}}||{{O}}||{{O}}||{{O}}||{{O}}||{{O}}||{{O | + | |Mind Game (Sneaky/RC) ||data-sort-value="4" {{C}}|2 vs 2||{{R}}|3 ||{{O}}||{{O}}||{{O}}||{{O}}||{{O}}||{{O}}||{{O}}||{{X}}||data-sort-value="8" {{X}} |
|- | |- | ||
| − | |Ambidextrous ||data-sort-value="10" {{C}}|5 vs 5||{{R}}|2 ||{{O}}||{{O}}||{{O}}||{{O}}||{{O}}||{{O}}||{{O}}||{{O | + | |Ambidextrous ||data-sort-value="10" {{C}}|5 vs 5||{{R}}|2 ||{{O}}||{{O}}||{{O}}||{{O}}||{{O}}||{{O}}||{{O}}||{{O}}||data-sort-value="9" {{X}} |
|- | |- | ||
| − | |Interference ||data-sort-value="4" {{C}}|2 vs 2||{{R}}|2 ||{{O}}||{{O}}||{{O}}||{{O}}||{{O}}||{{O}}||{{O}}||{{O | + | |Interference ||data-sort-value="4" {{C}}|2 vs 2||{{R}}|2 ||{{O}}||{{O}}||{{O}}||{{O}}||{{O}}||{{O}}||{{O}}||{{O}}||data-sort-value="9" {{X}} |
|- | |- | ||
| − | |Neighbours Fight ||data-sort-value="6" {{C}}|3 vs 3||{{R}}|5 ||{{O}}||{{O}}||{{O}}||{{O}}||{{O}}||{{O}}||{{O}}||{{O | + | |Neighbours Fight ||data-sort-value="6" {{C}}|3 vs 3||{{R}}|5 ||{{O}}||{{O}}||{{O}}||{{O}}||{{O}}||{{O}}||{{O}}||{{O}}||data-sort-value="9" {{X}} |
|- | |- | ||
| − | |Starving ||data-sort-value="6" {{C}}|3 vs 3||{{R}}|1 ||{{O}}||{{O}}||{{O}}||{{O}}||{{O}}||{{O}}||{{O}}||{{O | + | |Starving ||data-sort-value="6" {{C}}|3 vs 3||{{R}}|1 ||{{O}}||{{O}}||{{O}}||{{O}}||{{O}}||{{O}}||{{O}}||{{O}}||data-sort-value="9" {{X}} |
|- | |- | ||
| − | |Twitter mission 1 ||data-sort-value="4" {{C}}|2 vs 2||{{R}}|2 ||{{O}}||{{O}}||{{O}}||{{O}}||{{O}}||{{O}}||{{O}}||{{O | + | |Twitter mission 1 ||data-sort-value="4" {{C}}|2 vs 2||{{R}}|2 ||{{O}}||{{O}}||{{O}}||{{O}}||{{O}}||{{O}}||{{O}}||{{O}}||data-sort-value="9" {{X}} |
|- | |- | ||
| − | |Twitter mission 2 ||data-sort-value="6" {{C}}|3 vs 3||{{R}}|3 ||{{O}}||{{O}}||{{O}}||{{O}}||{{O}}||{{O}}||{{O}}||{{O | + | |Twitter mission 2 ||data-sort-value="6" {{C}}|3 vs 3||{{R}}|3 ||{{O}}||{{O}}||{{O}}||{{O}}||{{O}}||{{O}}||{{O}}||{{O}}||data-sort-value="9" {{X}} |
|- | |- | ||
| − | |Back to back ||data-sort-value="4" {{C}}|3 vs 3||{{R}}|6 | + | |Back to back ||data-sort-value="4" {{C}}|3 vs 3||{{R}}|6 ||{{O}}||{{O}}||{{O}}||{{O}}||{{O}}||{{O}}||{{O}}||{{O}}||data-sort-value="9" {{X}} |
|- | |- | ||
| − | |1 v 1 ||data-sort-value="2" {{C}}|1 vs 1||{{R}}|0 | + | |1 v 1 ||data-sort-value="2" {{C}}|1 vs 1||{{R}}|0 ||{{O}}||{{O}}||{{O}}||{{O}}||{{O}}||{{O}}||{{O}}||{{O}}||data-sort-value="9" {{X}} |
|- | |- | ||
| − | |1 v 2 ||data-sort-value="3" {{C}}|1 vs 2||{{R}}|0 | + | |1 v 2 ||data-sort-value="3" {{C}}|1 vs 2||{{R}}|0 ||{{O}}||{{O}}||{{O}}||{{O}}||{{O}}||{{O}}||{{O}}||{{O}}||data-sort-value="9" {{X}} |
|- | |- | ||
| − | |3 v 3 ||data-sort-value="6" {{C}}|3 vs 3||{{R}}|0 | + | |3 v 3 ||data-sort-value="6" {{C}}|3 vs 3||{{R}}|0 ||{{O}}||{{O}}||{{O}}||{{O}}||{{O}}||{{O}}||{{O}}||{{O}}||data-sort-value="9" {{X}} |
|- | |- | ||
| − | |4 v 4 ||data-sort-value="8" {{C}}|4 vs 4||{{R}}|0 | + | |4 v 4 ||data-sort-value="8" {{C}}|4 vs 4||{{R}}|0 ||{{O}}||{{O}}||{{O}}||{{O}}||{{O}}||{{O}}||{{O}}||{{O}}||data-sort-value="9" {{X}} |
|- | |- | ||
| − | |7 v 7 ||data-sort-value="14" {{C}}|7 vs 7||{{R}}|0 | + | |7 v 7 ||data-sort-value="14" {{C}}|7 vs 7||{{R}}|0 ||{{O}}||{{O}}||{{O}}||{{O}}||{{O}}||{{O}}||{{O}}||{{O}}||data-sort-value="9" {{X}} |
|} | |} | ||
| Line 74: | Line 74: | ||
</gallery> | </gallery> | ||
| − | === | + | === Sandbox maps === |
<gallery caption="Screenshots" widths="320px" heights="180px" perrow="4"> | <gallery caption="Screenshots" widths="320px" heights="180px" perrow="4"> | ||
| Line 83: | Line 83: | ||
File:Map instantiation order twitter mission 1.png |Twitter mission 1 | File:Map instantiation order twitter mission 1.png |Twitter mission 1 | ||
File:Map instantiation order twitter mission 2.png |Twitter mission 2 | File:Map instantiation order twitter mission 2.png |Twitter mission 2 | ||
| − | |||
| − | |||
| − | |||
| − | |||
| − | |||
File:Map instantiation order back to back.png |Back to back | File:Map instantiation order back to back.png |Back to back | ||
File:Map instantiation order 1 v 1.png |1 v 1 | File:Map instantiation order 1 v 1.png |1 v 1 | ||
Revision as of 11:48, 3 December 2017
Contents
Map pool
The map pool differs for each league and for unranked games in career as well as for sandbox mode:
| Map | Bots | Resources | Bronze | Silver | Gold | Platinum | Diamond | Master | Grandmaster | Unranked | Test |
|---|---|---|---|---|---|---|---|---|---|---|---|
| The seven wonders | 4 vs 4 | 7 | ✔ | ✔ | ✔ | ✔ | ✔ | ✔ | ✔ | ✔ | ✔ |
| Set your priorities | 5 vs 5 | 5 | ✔ | ✔ | ✔ | ✔ | ✔ | ✔ | ✔ | ✔ | |
| Meeting point | 6 vs 6 | 5 | ✔ | ✔ | ✔ | ✔ | ✔ | ✔ | ✔ | ||
| Circle of Death | 9 vs 9 | 0 | ✔ | ✔ | ✔ | ✔ | ✔ | ✔ | |||
| Split team | 5 vs 5 | 0 | ✔ | ✔ | ✔ | ✔ | ✔ | ||||
| Lake Rushtown (Mcompany) | 5 vs 5 | 11 | ✔ | ✔ | ✔ | ✔ | |||||
| Kingmaker (Erik) | 3 vs 3 | 7 | ✔ | ✔ | ✔ | ||||||
| Barred Spiral (radyjko8) | 6 vs 6 | 0 | ✔ | ✔ | ✔ | ||||||
| Dominance (Revenge) | 3 vs 3 | 3 | ✔ | ✔ | |||||||
| Flanking (LuBeNo) | 4 vs 4 | 0 | ✔ | ✔ | |||||||
| Mind Game (Sneaky/RC) | 2 vs 2 | 3 | ✔ | ✔ | |||||||
| Ambidextrous | 5 vs 5 | 2 | ✔ | ||||||||
| Interference | 2 vs 2 | 2 | ✔ | ||||||||
| Neighbours Fight | 3 vs 3 | 5 | ✔ | ||||||||
| Starving | 3 vs 3 | 1 | ✔ | ||||||||
| Twitter mission 1 | 2 vs 2 | 2 | ✔ | ||||||||
| Twitter mission 2 | 3 vs 3 | 3 | ✔ | ||||||||
| Back to back | 3 vs 3 | 6 | ✔ | ||||||||
| 1 v 1 | 1 vs 1 | 0 | ✔ | ||||||||
| 1 v 2 | 1 vs 2 | 0 | ✔ | ||||||||
| 3 v 3 | 3 vs 3 | 0 | ✔ | ||||||||
| 4 v 4 | 4 vs 4 | 0 | ✔ | ||||||||
| 7 v 7 | 7 vs 7 | 0 | ✔ |
Ranked maps
- Screenshots
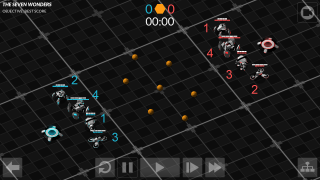
The seven wonders
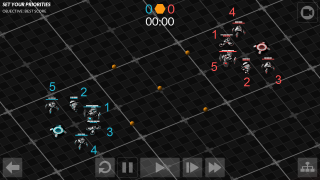
Set your priorities

Meeting point
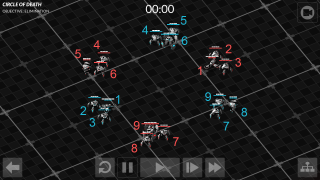
Circle of Death
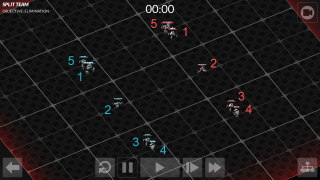
Split team

Lake Rushtown (Mcompany)

Kingmaker (Erik)
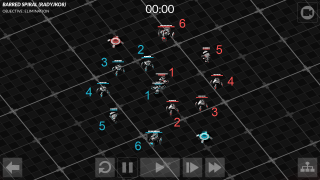
Barred Spiral (radyjko8)


Unranked maps
- Screenshots

Dominance (Revenge)

Flanking (LuBeNo)
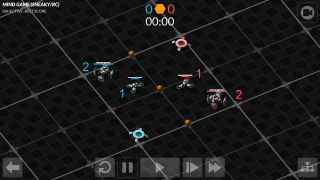
Mind Game (Sneaky/RC)


Sandbox maps
- Screenshots
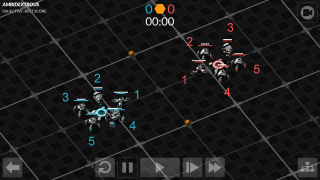
Ambidextrous
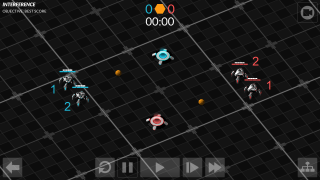
Interference
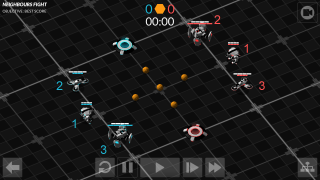
Neighbours Fight

Starving

Twitter mission 1
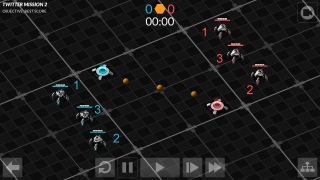
Twitter mission 2

Back to back

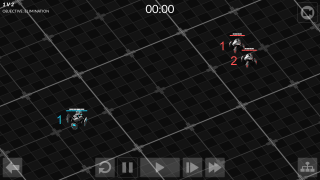
1 v 1
1 v 2
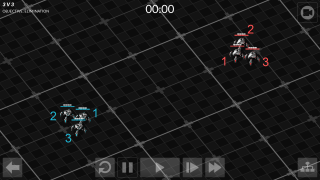
3 v 3
4 v 4

7 v 7


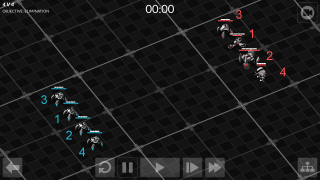
Instantiation order
There exists an instantiation order for the bot starting positions rarely used in the game. The order is shown in the map images above.
It is used in the following places:
- If several bots from the same team try to pick up the same resource the instantiation order defines who takes it. If a bot cannot pick up the resource it idles instead.
- If several bots try to team tag or team untag in a contradictory way they tag in the order specified in the instantiation order.
- If several entities share identical attributes in the entity selection process of target selectors.
Determining the instantiation order

The program to the right can determine the instantiation order.
- Each bot tries to (exclusive) team tag the tag "A" to itself.
- If a bot is team tagged "A" it waits 3 ticks and then team untags the "A" and goes to idle.
As the result all bots are team tagged "A" in reverse of the instantiation order.