Difference between revisions of "Strategies"
| Line 61: | Line 61: | ||
== Ideas worth implementing == | == Ideas worth implementing == | ||
| − | === | + | === Retreat === |
{{InformationCollapsed|1=Retreat at shield level other than 0-25%.|2=Retreat early when being attacked by several units at medium range. Don't wait until your shield is 0-25%, otherwise those enemy units attacking you at medium range will continue to attack you as you move into long range, which is something you want to avoid with such a low shield. If you're being attacked by a machine gun and a sniper at medium range then you'll probably want to retreat at all shield/health levels.}} | {{InformationCollapsed|1=Retreat at shield level other than 0-25%.|2=Retreat early when being attacked by several units at medium range. Don't wait until your shield is 0-25%, otherwise those enemy units attacking you at medium range will continue to attack you as you move into long range, which is something you want to avoid with such a low shield. If you're being attacked by a machine gun and a sniper at medium range then you'll probably want to retreat at all shield/health levels.}} | ||
| Line 67: | Line 67: | ||
{{InformationCollapsed|1=Only retreat as long as someone is attacking.|2=Don't retreat because your shield is low, but because someone attacks you. If no one attacks you anymore stop the retreat process.}} | {{InformationCollapsed|1=Only retreat as long as someone is attacking.|2=Don't retreat because your shield is low, but because someone attacks you. If no one attacks you anymore stop the retreat process.}} | ||
| − | === | + | === Attack === |
{{InformationCollapsed|1=Minimize the time spend switching attack targets.|2=Usually a bot should continuously attack the bot it started to attack. (by filtering a target attacked in the previous tick) Create strict rules for when to switch targets. For the sniper and machine gun, whose reload time is quite long, it's especially important.}} | {{InformationCollapsed|1=Minimize the time spend switching attack targets.|2=Usually a bot should continuously attack the bot it started to attack. (by filtering a target attacked in the previous tick) Create strict rules for when to switch targets. For the sniper and machine gun, whose reload time is quite long, it's especially important.}} | ||
| − | {{InformationCollapsed|1=Focus fire.|2=Prioritize enemies that are already being attacked by your allies.}} | + | {{InformationCollapsed|1=Focus fire.|2=Prioritize enemies that are already being attacked by your allies. Also prioritize enemies with 0-25% shield.}} |
{{InformationCollapsed|1=Focus the enemy sniper.|2=Pay a lot of attention to your opponent's sniper. Your sniper should prioritize attacking the enemies sniper. If your sniper hits the opponent's sniper then it's probably worth changing the attack target of all your nearby units to it, even if they are attacking medium range units. (and only if it is safe/worthwhile doing so)}} | {{InformationCollapsed|1=Focus the enemy sniper.|2=Pay a lot of attention to your opponent's sniper. Your sniper should prioritize attacking the enemies sniper. If your sniper hits the opponent's sniper then it's probably worth changing the attack target of all your nearby units to it, even if they are attacking medium range units. (and only if it is safe/worthwhile doing so)}} | ||
| − | + | === Push === | |
| − | == | + | {{InformationCollapsed|1=Shoot medium range.|2=Aggressively push to medium range. Little damage is done at long range, so pushing to medium maximizes your damage and also pushes your opponent, especially if you have many pushing at once. Careful, a bad push can be a big risk too.}} |
| − | {{InformationCollapsed|1= | + | {{InformationCollapsed|1=Push in the right moment.|2=Don't push when being attacked. Sometimes the pushing process should be aborted, because too many enemies are around.}} |
| − | {{InformationCollapsed|1= | + | {{InformationCollapsed|1=Flank or circle bots.|2=Flanked and circled bots get easily destroyed. For flanking moves one can use an {{Tooltip|APS|Arena Positioning System}} (use a combination of moving to and fleeing from bases, resources and bots to navigate).}} |
| − | + | === Resources === | |
| − | {{InformationCollapsed|1=|2= | + | {{InformationCollapsed|1=Score wisely|2=Mid game scoring has pros and cons. Scoring to much leaves you defenseless against an aggressively pushing enemy. Scoring not at all will probably result in a game lost 0:1. Keep an eye on the health values of your bots and if the enemy team is scoring.}} |
| − | + | ||
| − | + | ||
| − | + | ||
| − | + | ||
| − | + | {{InformationCollapsed|1=Score unexpected|2=Try to rush for early resources or smuggle resources mid game. Sometimes also picking 2 or 3 resources at once works.}} | |
| − | + | === Shotgun === | |
| + | {{InformationCollapsed|1=Shoot at second sight|2=The shotgun should not always start shooting at the first bot it sees at medium range. Its good to get as close as you can to medium range units, especially if they are retreating or being attacked by an ally. This will give your shotgun more medium range shots as the enemy unit tries to escape from medium range. For example only stop moving towards medium range units when at least 2 units are in medium range.}} | ||
| − | + | === General === | |
| − | + | {{InformationCollapsed|1=Think about maintainability.|2=Don't use to complicated structures, map and bot specific stuff. It's easier to make one generic AI then to handle a truckload of specialized ones.}} | |
| − | + | {{InformationCollapsed|1=Ignore tagging.|2=New players can totally ignore tagging. (especially for combat) They will probably waste a lot of time (ticks) using them.}} | |
| − | + | {{InformationCollapsed|1=Start experimenting.|2=Don't follow rules. Sometimes you have to break a rule to dominate. Some rules also have cons one should be wary about.}} | |
| − | + | <!-- | |
| − | + | ||
| − | + | ||
| − | |||
| − | |||
| − | |||
| − | |||
| − | |||
| − | + | {{InformationCollapsed|1=|2=}} | |
| + | {{InformationCollapsed|1=|2=}} | ||
| + | {{InformationCollapsed|1=|2=}} | ||
| + | {{InformationCollapsed|1=|2=}} | ||
| − | |||
| − | + | 9. Group your units together. Players do this in various ways. Many will move the unit to the nearest ally during a game if they wander too far away. I don't do that. | |
| − | + | --- | |
| − | + | ||
| + | ** [https://forum.gladiabots.com/viewtopic.php?f=22&t=126&p=4470#p4470 decorators] | ||
| + | |||
| + | Dancing (both resource and range based) | ||
--> | --> | ||
Revision as of 23:01, 27 December 2017
| This page needs improvement, you are welcome to contribute. |
Contents
[hide]Best practices for AI design
Some best coding practices from software development also apply to AIs in Gladiabots. The following rules can help improve the quality of AIs, enhancing both the initial development and subsequent maintenance of the AI.
|
|
|
|
|
Useful resources
There are several places to discover new strategies, learn tactics of other players or ask questions:
- Check the community forum. Also "old" topics there can give nice information.
- Especially the sections Strategies and Questions are interesting.
- For example check this topic about shared ideas how players approach the game. Several strong players of the year 2017 contributed to it.
- Check the chat groups on telegram and discord.
- Check the wiki itself to learn about game mechanics and bot programming and their sub topics. There are several nifty details to discover.
- Check the changelog or roadmap to learn about recent or planned changes and adjust your AIs according to them.
Last but not least one should play the game. Especially lost games show flaws of the AI, that need to improved. Try to analyze the strategy your enemy used.
Simple bots
One can learn of bots with few nodes that have a pretty good performance in the game. They are a great base to start optimizing for beginners but also for advanced players to test their AI against.
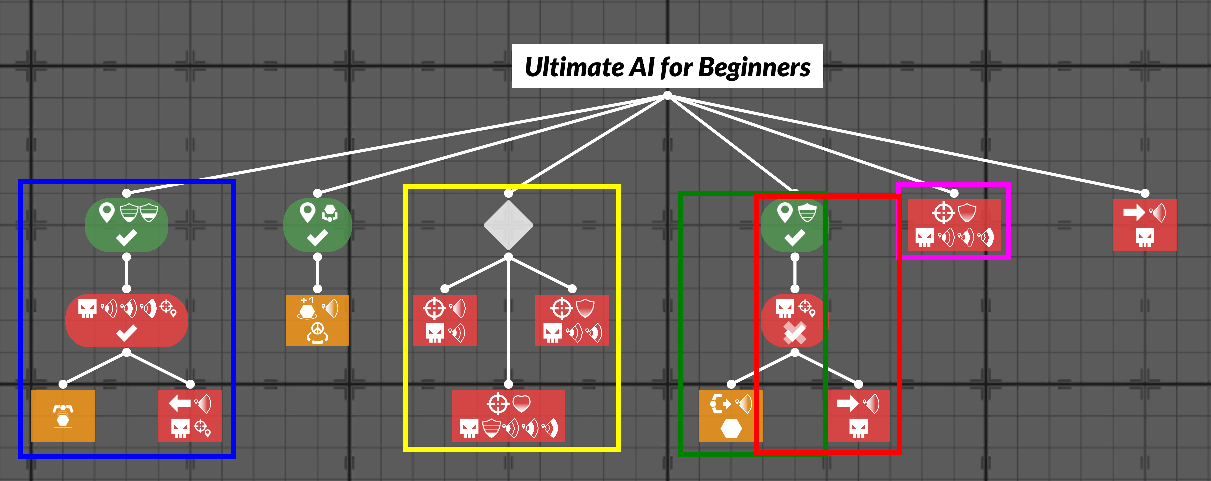
Ultimate AI for beginners (16 nodes)
PEW presented this Ultimate AI for beginners in the forum.

The AI is split into this main modules:
- Blue: The retreat module
- Yellow: The shooting module (with high priority)
- Green: The resource module
- Red: The pushing module
- Pink: The shooting module (with low priority)
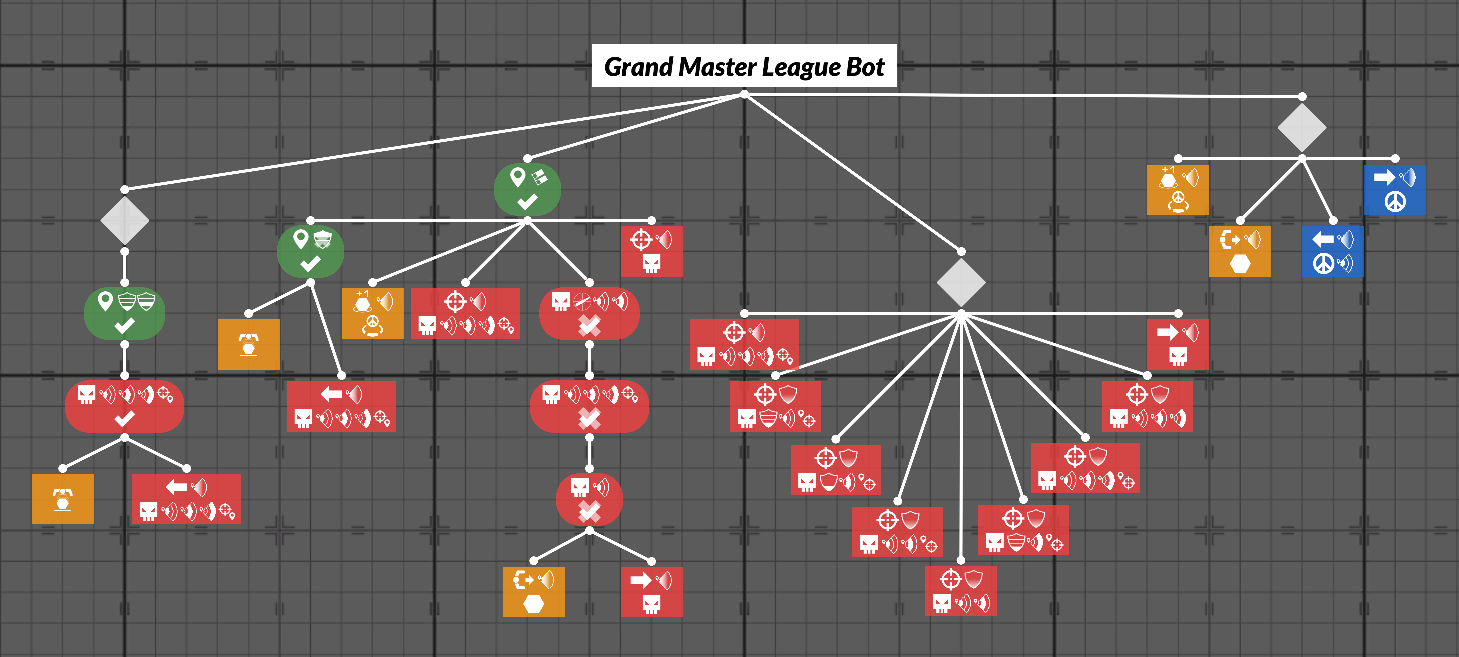
Grand Master League Bot (30 nodes)
LuBeNo presented this Grand Master League Bot in the forum.

The AI is split into this modules:
- Defense
- Shotgun
- Offense
- Dancing
Ideas worth implementing
Retreat
|
|
Attack
|
|
|
Push
|
|
|
 (use a combination of moving to and fleeing from bases, resources and bots to navigate).
Resources
|
|
Shotgun
|
General
|
|
|